Eclipse is a very popular and widely used software development environment.
It can be used to develop applications in various languages like Java ,C++,PHP and many more.
Here we will discuss about the use of Eclipse to develop Hello World program in 6 simple steps.
STEP 1. Download and Install JDK
JDK(Java Development Kit) will be required to run Eclipse as well as develop and test your application.Various versions of JDK are available, I recommend you to download JDK 1.6
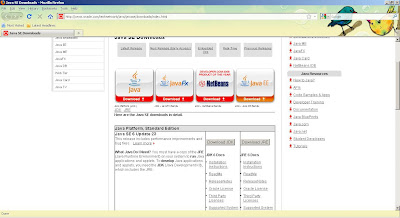
JDK can be downloaded here ---> http://www.oracle.com/technetwork/java/javase/downloads/index.html
STEP 2: Download and Install Eclipse
Eclipse is available in a zip format. Just unzip it to install.
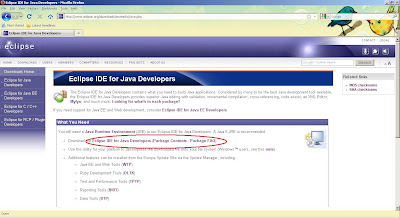
You can download and install it from this link. http://www.eclipse.org/downloads/moreinfo/java.php
STEP 3: Starting and Configuring Eclipse
Eclipse can be run by launching eclipse.exe in the installation directory.
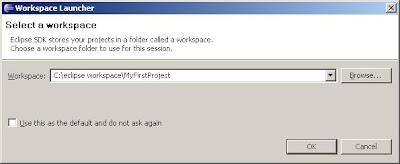
On starting eclipse, you will be prompted to choose a workspace.This is a folder location where your java files will be saved. I will name the workspace C:\eclipse workspace\MyFirstProject and press OK.
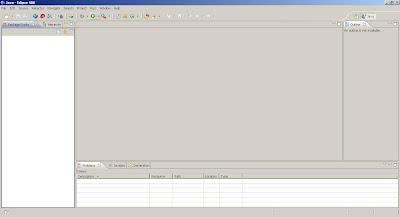
Eclipse window will open and you will see the welcome screen.Close the welcome screen tab.
Now, go to File -> New -> Java project
You will see a screen like this.
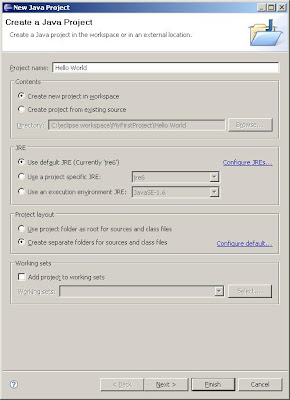
Here I will give the project name as 'Hello World'.
Select the 'Use default JRE(Currently JRE 6)' option.
Click Finish.
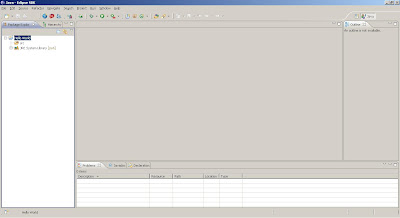
The Hello world project will appear in the left side panel.
 STEP 4. Creating Java class
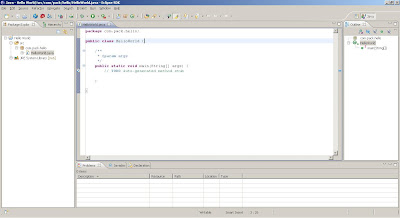
Go to File -> New -> Class
A new Java class window will appear as shown below.

Here, you have to specify following:
The new class will appear in the editor and also a node will appear in the left panel below the project node.
STEP 5: Writing the code
Let us write a simple java code to print 'Hello world'.
Type following code in the main() method
System.out.println("Hello world !!!");
P.S. A short cut to writing System.out.println is :
Write sysout and press cntrl + space bar
the sysout will convert to System.out.println("");
STEP 6: Running the code
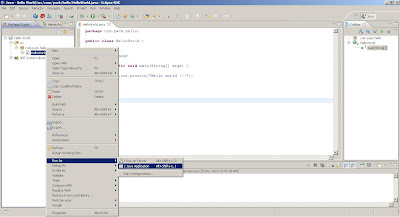
Right-click on the HelloWorld class icon and select
Run As - > Java Application
as shown in the screenshot below.
If you have done everything right,you should see 'Hello World !!!' printed in the console in the bottom panel.

Congrats. You have successfully developed your first java application !!!
It can be used to develop applications in various languages like Java ,C++,PHP and many more.
Here we will discuss about the use of Eclipse to develop Hello World program in 6 simple steps.
STEP 1. Download and Install JDK
JDK(Java Development Kit) will be required to run Eclipse as well as develop and test your application.Various versions of JDK are available, I recommend you to download JDK 1.6

JDK can be downloaded here ---> http://www.oracle.com/technetwork/java/javase/downloads/index.html
STEP 2: Download and Install Eclipse
Eclipse is available in a zip format. Just unzip it to install.

You can download and install it from this link. http://www.eclipse.org/downloads/moreinfo/java.php
STEP 3: Starting and Configuring Eclipse
Eclipse can be run by launching eclipse.exe in the installation directory.
On starting eclipse, you will be prompted to choose a workspace.This is a folder location where your java files will be saved. I will name the workspace C:\eclipse workspace\MyFirstProject and press OK.

Eclipse window will open and you will see the welcome screen.Close the welcome screen tab.

Now, go to File -> New -> Java project
You will see a screen like this.

Here I will give the project name as 'Hello World'.
Select the 'Use default JRE(Currently JRE 6)' option.
Click Finish.
The Hello world project will appear in the left side panel.
 STEP 4. Creating Java class
Go to File -> New -> Class
A new Java class window will appear as shown below.

Here, you have to specify following:
- Name of the package - Lets say com.pack.hello
- Name of the class - HelloWorld
- Select the checkBox 'public static void main...' (This will create the main method for your class)
The new class will appear in the editor and also a node will appear in the left panel below the project node.

STEP 5: Writing the code
Let us write a simple java code to print 'Hello world'.
Type following code in the main() method
System.out.println("Hello world !!!");
P.S. A short cut to writing System.out.println is :
Write sysout and press cntrl + space bar
the sysout will convert to System.out.println("");
STEP 6: Running the code
Right-click on the HelloWorld class icon and select
Run As - > Java Application
as shown in the screenshot below.

If you have done everything right,you should see 'Hello World !!!' printed in the console in the bottom panel.

Congrats. You have successfully developed your first java application !!!
Comments
Post a Comment
Have some feedback, comment or question ?
Post it here in comments section.