A jar file is a Java ARchive file that contains many java .class files as well as other resource files in a compressed format.
It is similar to a tar or zip format.
Here are three simple steps with illustrations to create your jar file in Eclipse IDE.
Step 1 : Create your java class(es)
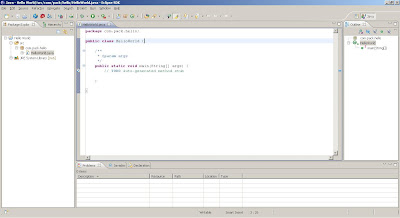
I have written a java class HelloWorld.java in Eclipse in a package called HelloWorld as shown below.

Step 2 : Choose the export file format
Now I want to put entire project in a jar file.
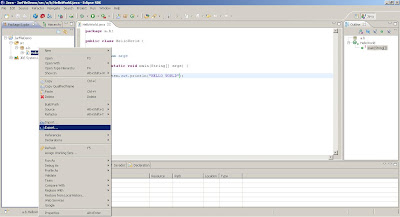
Right-click on the package and select export.

Now select under Java icon JAR as shown.

Step 3 : Specify the jar file name and location
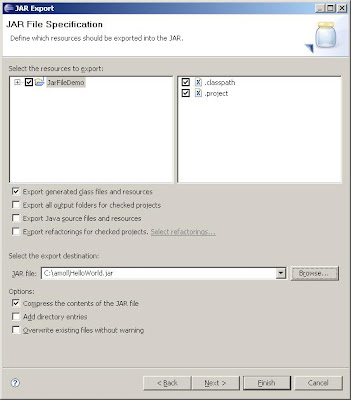
I give the jar file name as C:\amol\HelloWorld.jar as shown

I check 'Export generated class files and Resources' and 'compress the contents of jar file' checkboxes.
Thats it.
Now just click finish and your jar file will be created at the given location.
CGTUXEU3CDMS
It is similar to a tar or zip format.
Here are three simple steps with illustrations to create your jar file in Eclipse IDE.
Step 1 : Create your java class(es)
I have written a java class HelloWorld.java in Eclipse in a package called HelloWorld as shown below.

Step 2 : Choose the export file format
Now I want to put entire project in a jar file.
Right-click on the package and select export.

Now select under Java icon JAR as shown.

Step 3 : Specify the jar file name and location
I give the jar file name as C:\amol\HelloWorld.jar as shown

I check 'Export generated class files and Resources' and 'compress the contents of jar file' checkboxes.
Thats it.
Now just click finish and your jar file will be created at the given location.
CGTUXEU3CDMS
Comments
Post a Comment
Have some feedback, comment or question ?
Post it here in comments section.